Cookies
Getting and setting browser cookies
A cookie (also called web cookie, Internet cookie, or browser cookie) is a small piece of data sent from a website and stored on the user's computer by the web browser while the user is browsing a website. Cookies have a variety of uses but in the context of test automation, cookies can be leveraged to speed up the authentication process as the cookie can be set directly, without the need to perform the entire login flow.
Testim enables you to set cookies and get cookies in a variety of ways. When you “set” a cookie in Testim, you write the value of its attributes to the browser. When you “get” a cookie, you retrieve the value of the cookie in the browser and can then assign it to a variable.
Testim provides a variety of ways to handle cookies.
- Cookie steps – you can create specialized steps in your test to handle cookies, options are:
- Set Cookie – create a new step in your test which defines a cookie to be used in the test. The recommended method for creating HttpOnly cookies and Secure cookies is through the Set Cookie step.
- Get Cookie – create a new step that gets cookie data from your AUT browser and store it as a parameter. This parameter can then be used in your test steps, including a “Set cookie” step.
- Setup step – “Test Data” property – you can set your cookies in the Test Data property if you need your cookies for a particular test. If you need your cookies to load prior to your page loading in the browser, use this method. The recommended way of adding a domain to a cookie is through this Test Data property.
- Custom JS (JavaScript) step – you can set and get your cookies in a Custom JavaScript step if you need your cookies for a particular test, but don’t necessarily need them at the start of the test.
- Configuration File & Run Hooks – you can set your cookies by using a configuration file when working through the CLI. This option is useful when you need the cookies for your entire test suite. Note: you cannot “get” cookies through the CLI.
Setting Cookies
Testim enables you to “set” cookie values for your tests either by entering the values directly or by getting them from variables/parameters that have been previously defined by a “Get cookie” step.
Setting Cookies using the Set Cookie step
The Set Cookie step allows you to set cookies directly from the UI within the context of a test. You can set a cookie by manually entering its attributes or by using a cookie parameter from a previous Get Cookie step. Using a parameter allows you “set” the value of a cookie that you have manipulated (after using the "get cookie" to get the cookie values).
To set a cookie by entering its attributes:
- Hover over the (arrow symbol) where you want to add the step.

The action options are displayed.
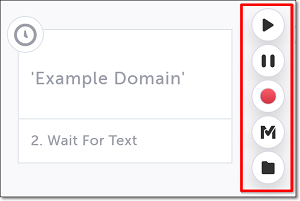
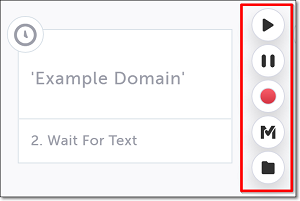
- Click on the “M” (Testim predefined steps).
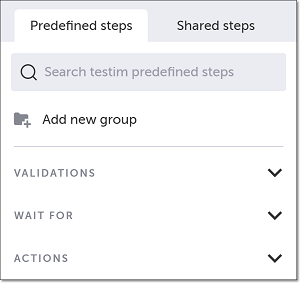
The Predefined steps menu opens.
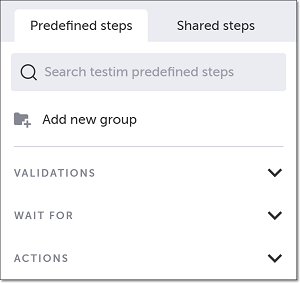
- Click on Actions.
The Actions menu expands.
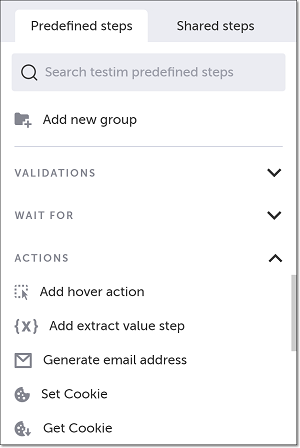
- Scroll down through the menu and select Set Cookie.
Alternatively, you can use the search box at the top of the menu to search for Set Cookie.
The Set Cookie screen is shown.
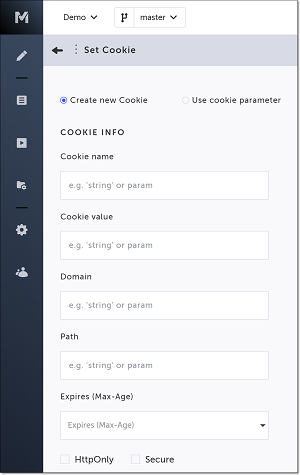
- Ensure the Create new Cookie radio button is selected (default).
- Enter your desired values in the first four Cookie Info fields.
- Cookie name – the name of the cookie. This parameter is required.
- Cookie value – the value you wish to assign to the cookie. This parameter is required.
- Domain – the host to which the cookie will be sent. The default Domain (blank) is the Base URL your test is running on. This parameter is optional.
- Path – the path that must exist in the request URL. The default Path (blank) is the root directory. This parameter is optional.
Strings must be surrounded by single or double quotes.
- In the Expires (Max-Age) field, select from the dropdown your desired expiration time for your cookie (default = session).
- Select the HttpOnly checkbox if you want your cookie set to HttpOnly.
- Select the Secure checkbox if you want your cookie set to Secure.
- Click the back arrow to return to the main Editor window.
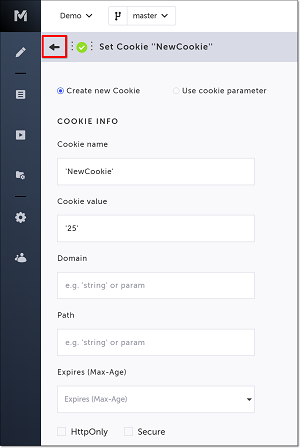
When you run your test your cookie will be set.
To set a cookie using a cookie parameter:
- Hover over the (arrow symbol) where you want to add the step.

The action options are displayed.
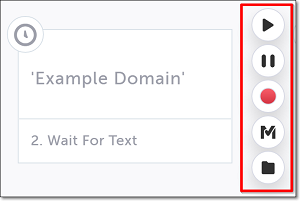
- Click on the “M” (Testim predefined steps).
The Predefined steps menu opens.
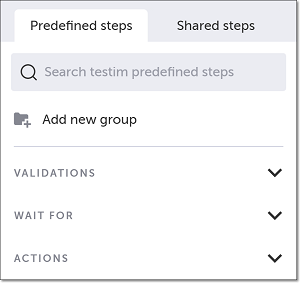
- Click on Actions.
The Actions menu expands.
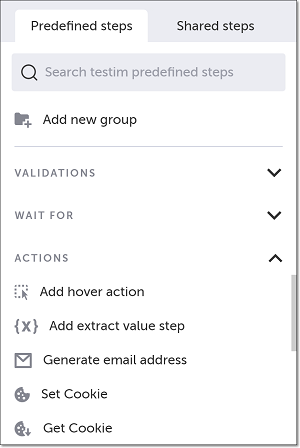
- Scroll down through the menu and select Set Cookie.
Alternatively, you can use the search box at the top of the menu to search for Set Cookie.
The Set Cookie screen is shown.
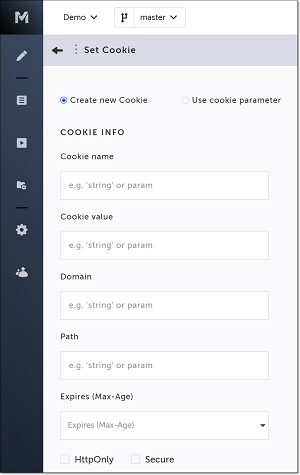
- Select the Use cookie parameter radio button.
The Parameter Name field is shown.

- In the Parameter Name field, enter the name of a previously created cookie parameter/variable. For more information, see Getting Cookies using the Get Cookie step.
- Click the back arrow to return to the main Editor window.

When you run your test, your cookie will be set with the current value of the cookie parameter you entered in this step.
Setting Cookies using the Setup step – “Test Data” property
Set your cookies in the Test Data property of the Setup step if you need your cookies for a particular test, or if you need to have the cookies loaded before your page loads.
To set cookies in the Test Data property:
- Hover over the Setup step (the first step in your test), and click on the Show Properties () icon.

The Test Configuration Properties panel opens on the right-hand side.
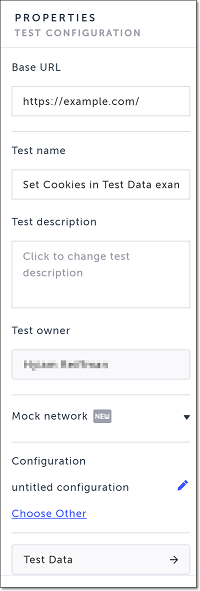
Alternatively, you can double-click the Setup step, or click the Show step properties icon in the top right corner of the screen.
- Scroll down through the options, and click Test Data.
A JavaScript editor opens.

- In the editor enter the code for setting your cookies.
return {
 "cookies":[{
    "name": "username",
    "value": "tomsmith",
    "domain": "http://google.com"
  },{
    "name": "password",
    "value": "SuperSecretPassword!"
  }]
};
name = cookie name
value = cookie value
domain = cookie domain (optional)
Click the back arrow to return to the main Editor window.

When you run your test the cookies will be loaded before your page loads.
Setting Cookies using a custom JS (JavaScript) step
Set your cookies in a Custom JavaScript step if you need your cookies for a particular test, but don’t necessarily need them at the start of the test.
To set cookies using JavaScript in a “custom action” step:
- Hover over the (arrow symbol) where you want to add the cookies.

The action options are displayed.
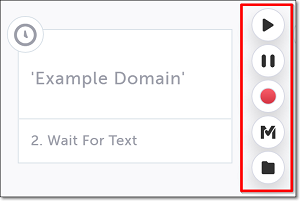
- Click on the “M” (Testim predefined steps).
The Predefined steps menu opens.
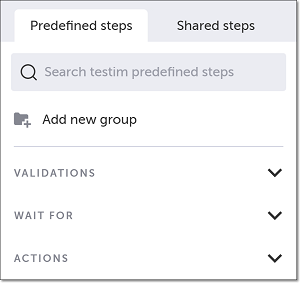
- Click on Actions.
The Actions menu expands.
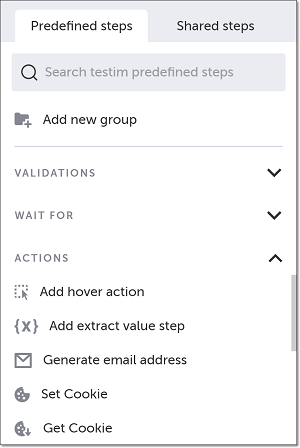
- Scroll down through the menu and select Add custom action.
The Add Step window opens.
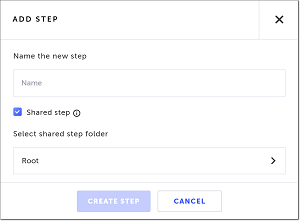
Alternatively, you can use the search box at the top of the menu to search for Add custom action.
- In the Name the new step field, enter a (meaningful) name for this step.
- If this is a shared step (to be made available to reuse in this and other tests), keep the box next to Shared step selected, and select a folder in which to save the step. (This is the default.) Otherwise, deselect it.
- Click Create Step.
The JS Editor opens, and the Custom Action Properties panel opens on the right-hand side.

- In the editor, enter code to set your cookies, using the following as an example.
document.cookie = "password=SuperSecretPassword!";
document.cookie = "username=tomsmith";
- Optionally fill in the properties in the Custom Action Properties panel.
- Step name – The name of the step. (Default is the name you entered in Step 5.)
- Description – The description of the step. (Default = Run action)
- Share step – Allows you to set this step as a shared step.
- + Params – Add JavaScript or HTML parameters. For more information see Parameters in custom JavaScript steps.
- When this step fails – Specify what to do if the step fails.
- When to run step – Specify conditions for when to run the step. For more info, see Conditions.
- Override timeout – Allows you to override the default time lapse setting which causes Testim to register a fail for a test step, and specify a different time lapse value (in milliseconds)
When you run your test, the cookies will be set at the location where you added the Custom Action step.
Setting Cookies using a Configuration File
You can set your cookies by using a configuration file when working through your CLI. A configuration file is a JavaScript file containing all the required parameters to run your test suite and run hooks which can be used to set up the application backend. This option is useful when you need the cookies for your entire test suite.
To set cookies using a configuration file:
- Create a JavaScript configuration file. See Configuration file & run hooks.
- Add code to the beforeSuite section in order to set the cookies. Use the following code as a model.
beforeSuite: function (suite) {
  return {
    "cookies":[
        {
      "name": "username",
      "value": "tomsmith",
    },
        {
      "name": "password",
      "value": "SuperSecretPassword!"
    }]
  };
}
Getting Cookies
Testim enables you to “get” cookies by assigning the value of a cookie to a variable. You can then use the cookie attributes in your test.
Getting Cookies using the Get Cookie step
The Get Cookie step allows you to get cookies directly from the UI within the context of a test by storing the value of a cookie in a variable.
To get a cookie using the Get Cookie step:
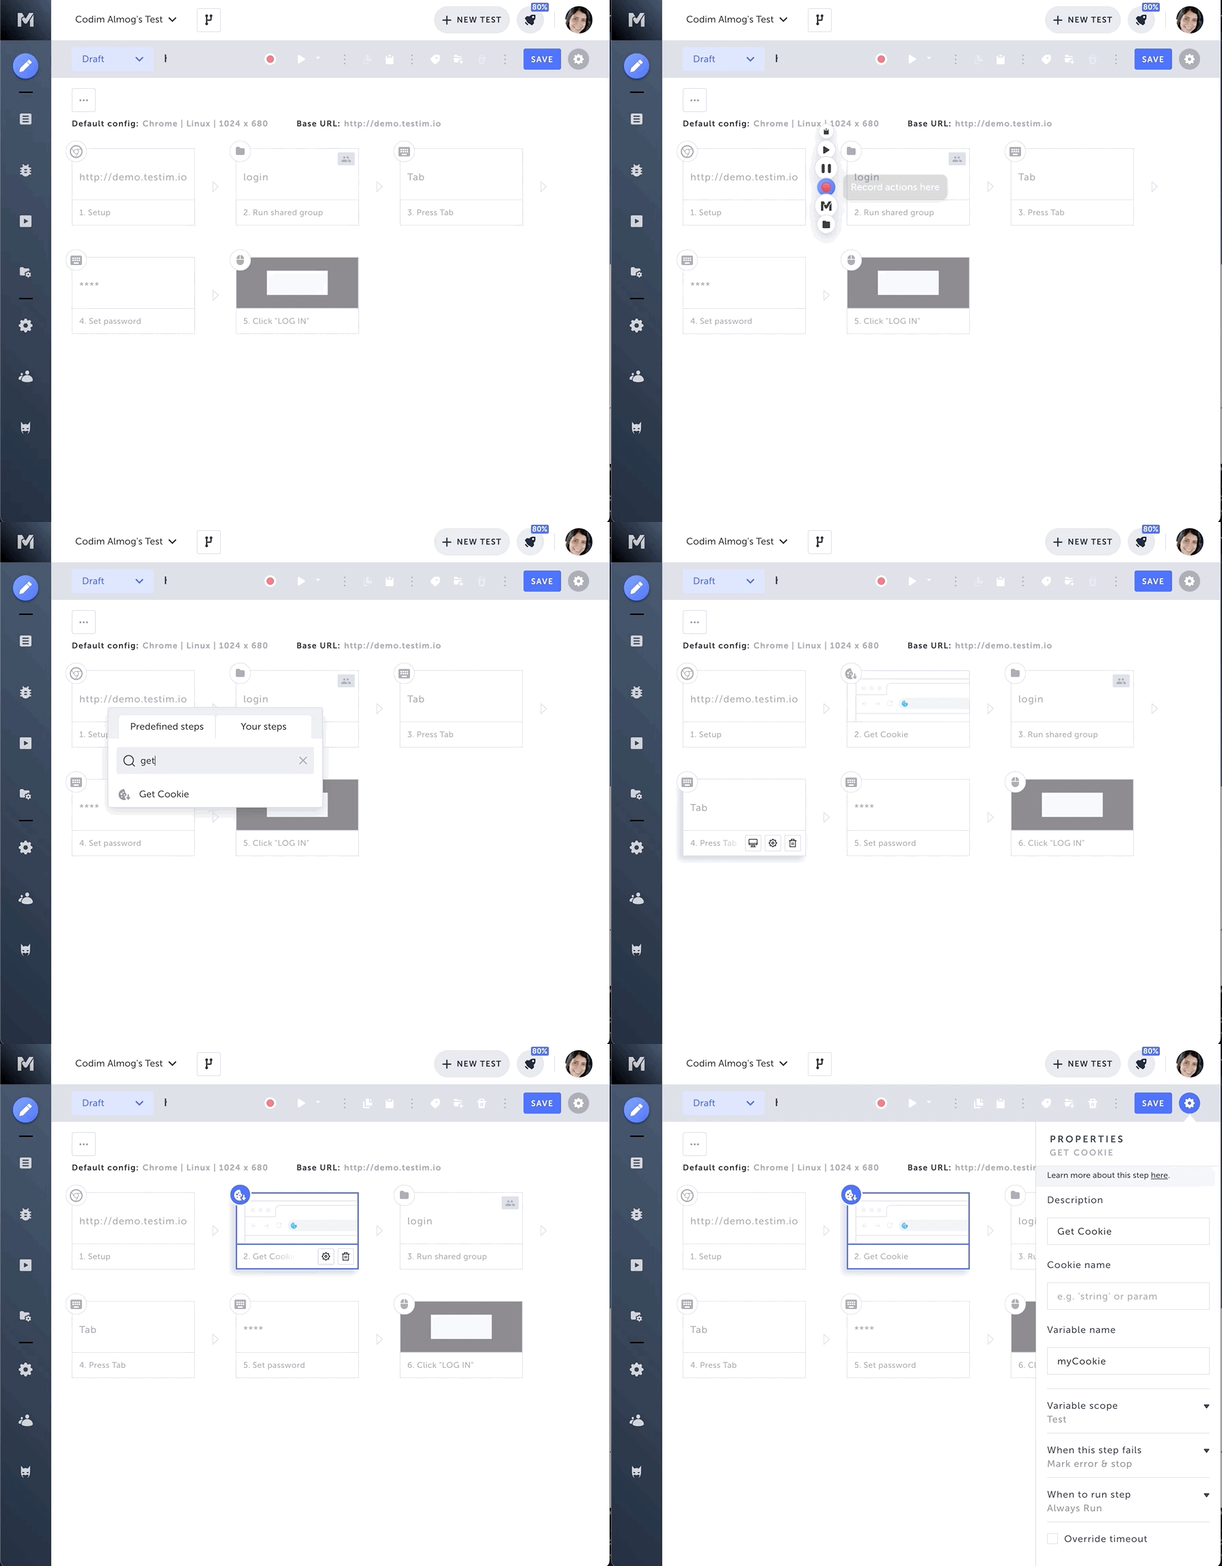
- Hover over the (arrow symbol) where you want to add the step.

The action options are displayed.
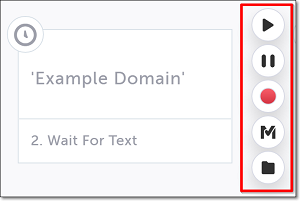
- Click on the “M” (Testim predefined steps).
The Predefined steps menu opens.
- Click on Actions.
The Actions menu expands.
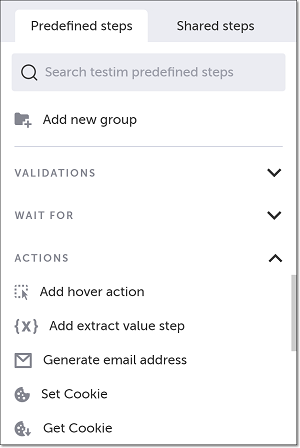
- Scroll down through the menu and select Get Cookie.
Alternatively, you can use the search box at the top of the menu to search for Get Cookie.
A “Get Cookie” step is added in the Editor.
5. Hover over the newly created step, and click on the Show Properties () icon.

The Properties panel opens on the right-hand side.
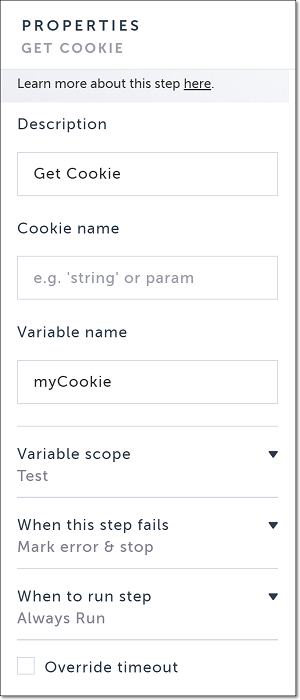
- Fill in the properties as described below.
- Description – The description of the step. (Default = Get Cookie)
- Cookie name – The name of the cookie you are getting. (Strings must be surrounded by single or double quotes.)
- Variable name – The name of the variable in which you wish to store the cookie data. (Default = myCookie)
- Variable scope – The scope in which the variable can be passed:
- Local: allows you to pass parameters between steps in the same scope.
- Test: allows you to pass parameters between steps and groups in the same test.
- Suite: allows you to pass parameters between tests in the same test suite.
- When this step fails – Specify what to do if the step fails.
- When to run step – Specify conditions for when to run the step. For more info, see Conditions.
- Override timeout – Allows you to override the default time lapse setting which causes Testim to register a fail for a test step, and specify a different time lapse value (in milliseconds)
When the test is run, the specified cookie will be stored in the variable.
Getting Cookies using a custom JS (JavaScript) step
You can get cookies without having to use the Get Cookie step by adding a “custom action” step, and entering your code in the JavaScript editor.
To get a cookie using JavaScript in a “custom action” step:
- Hover over the (arrow symbol) where you want to add the step.

The action options are displayed.
- Click on the “M” (Testim predefined steps).
The Predefined steps menu opens.
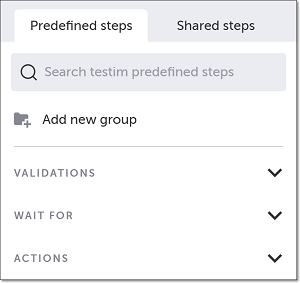
- Click on Actions.
The Actions menu expands.
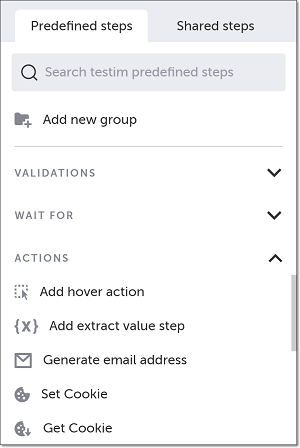
- Scroll down through the menu and select Add custom action.
The Add Step window opens.
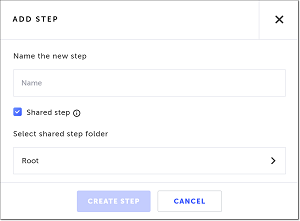
Alternatively, you can use the search box at the top of the menu to search for Add custom action.
- In the Name the new step field, enter a (meaningful) name for this step.
- If this is a shared step (to be made available to reuse in this and other tests), keep the box next to Shared step selected, and select a folder in which to save the step. (This is the default.) Otherwise, deselect it.
- Click Create Step.
The JS Editor opens, and the Custom Action Properties panel opens on the right-hand side.

- In the editor, enter code to get your cookies. The following example gets and prints the value of the cookies named username and password.
//create an array of the site cookies
let cookieArray = document.cookie.split("; ");
var name = "username=";
for(var i = 0; i <cookieArray.length; i++) {
    var c = cookieArray[i];
    while (c.charAt(0) == ' ') {
      c = c.substring(1);
    }
    if (c.indexOf(name) == 0) {
      console.log("username = " + c.substring(name.length, c.length));
    }
}

var name = "password=";
for(var i = 0; i <cookieArray.length; i++) {
    var c = cookieArray[i];
    while (c.charAt(0) == ' ') {
      c = c.substring(1);
    }
    if (c.indexOf(name) == 0) {
      console.log("password = " + c.substring(name.length, c.length));
    }
}
- Optionally fill in the properties in the Custom Action Properties panel.
- Step name – The name of the step. (Default is the name you entered in Step 5.)
- Description – The description of the step. (Default = Run action)
- Share step – Allows you to set this step as a shared step.
- + Params – Add JavaScript or HTML parameters. For more information see Parameters in custom JavaScript steps.
- When this step fails – Specify what to do if the step fails.
- When to run step – Specify conditions for when to run the step. For more info, see Conditions.
- Override timeout – Allows you to override the default time lapse setting which causes Testim to register a fail for a test step, and specify a different time lapse value (in milliseconds)
When you run your test, the Get Cookies function will run as part of the Custom Action step that you have added.
Updated almost 3 years ago
