
Branch Management
Manage your tests according to your team development process.
By managing your tests with branches, you can get test results at a much earlier stage of development. In other words, when you use branches, you'll be able to test new features as they are being developed, instead of waiting for the final release.
When creating a branch, you "freeze" the state of the tests. Modifying a test in one branch does not affect how the test behaves in other branches.
This is a pro feature
This feature is only open to projects on our professional plan. To learn more about our professional plan, click here.
Using Branches
- As a starting point, each project is composed of a single "master" branch.
- It's a good idea to create a new branch for every branch your team develops (e.g. your git branch), and test each branch independently. Testim can be integrated with GitHub, allowing you to automatically create new branches as they are created in GitHub and automatically merge tests when you merge your code.
- You can switch branches at any time and modify tests within a branch as you like. Modifications in one branch will not affect other branches.
- At a certain point you may want to merge between branches (e.g. merging a feature branch into the Master branch). To perform the merge, follow the instructions in the Merging Branches section. When you merge your (product) code, you should also merge your testing code. After the merge, consider deleting the branch .
Popular use cases for using Branches
You'll probably want to use branches in the following use cases:
- To sync with your development process - Creating branches according to your different development environments makes it easier to manage, track & modify your tests in parallel with the development releases.
- To test a new feature in a "sterile" environment - If the feature may affect other tests, it's a good idea to test it independently. Once everything works fine, then merge it to another branch.
- To test different stages - If your deployment process goes through several stages (e.g. Canary, Dev, Stable)
How to add a new branch?
Branches are added to a project and will include all the tests that existed in the source branch (e.g. the Master branch). You can add a new branch from any screen (e.g. Test List screen, a specific test, etc.). Any change you make to the tests will be automatically associated with the current branch. Other branches will not be affected.
To add a new branch:
- Click the Create New Branch (fork icon) button in the menu.
- Name your branch.
- Once created, you'll be able to modify your tests in the new branch. This will not affect the tests of the Master branch.
For large projects, we will not redirect you to the new branch automatically, you will be able to switch to that branch once it will be created.

Shared Attributes Between Branches
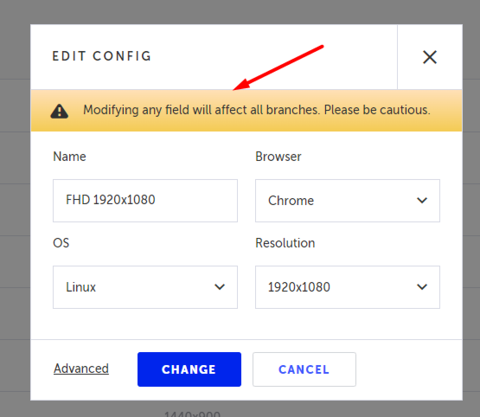
There are a few attributes that when edited, trigger automatic updates across all branches, even without explicit merging. These attributes are indicated with a notice that modifying them will affect all branches immediately without requiring explicit merging (even if the ‘Master’ branch is in read only mode).
For example, all fields in the Edit Config screen will be automatically merged across all branches. As displayed below, there is a notice indicating this fact:
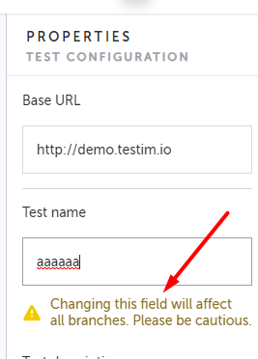
Here is another example of a notification relating to a specific attribute:
The following is a list of these attributes:
- test name & description
- test labels
- test configuration (both test’s ‘untitled configuration’ and ‘configuration library’ instances)
- suite name & description
- shared group/step name.
- test plan
- scheduler
- hiding shared steps
Switching Branches
You can switch to another branch or to the master branch.
To switch branch:
- Click on the Branches drop-down menu at the top to see the list of branches and select the desired branch. The date near each branch name indicates when it was last modified.
- You can use the Search function to filter the list of branches.

Note
In case a test does not exist in the target branch, you'll be directed to the tests list - There you'll be able to see all the relevant tests that are associated with the current branch.
Pinning a Branch
The first time you log in to Testim, the default view of your project is the master branch. The master branch is pinned as indicated with the pin icon. You can choose a different branch to pin so that every time you log in (until you pin a different branch), the data that is shown reflects your pinned branch.
To pin a branch:
- Click on the branch dropdown menu.

The project branches are shown.
- Hover over the branch you want to pin and click on the “pin” button.

The branch is pinned. Every time you access your project, the data from the pinned branch will be displayed.
Pinning another branch
When you pin another branch (including the master branch), the existing pin is removed for the currently pinned branch.
Deleting a branch
After the branch has been merged it is recommended to delete the branch.
To delete a branch:
- Click on the Branches drop-down menu at the top to see the list of branches and hover your mouse on the desired branch.
- Click the Delete icon.

- Click OK to confirm the deletion.
Running a test suite on a specific branch through the CLI
To run on a specific branch, use this parameter in your CLI
--branch <branch-name>
Branches integration with your CI
In order to run the appropriate test suite for the current development branch, you can either specify the branch name for that build (--branch) or if you are using one of the following: Jenkins, CircleCI or TravisCI, the Testim CLI will automatically run tests for the same branch if the following parameter is used.
--branch auto-detect
Updated 6 months ago