
Configuration Library - Web
Use the same test configuration in multiple/all tests
The Configuration List page shows all of the test configurations that were created and available to use for your tests, whether you run them locally or with your CLI. A test’s configuration determines the system specifications used to run the test. If you intend to run a test locally then the configuration should match your local environment. If you intend to run a test on the Testim Grid, then Testim simulates the environment that you specified. You can include a test configuration when running tests with your CLI by using the --test-config flag. For more information, see Test Config. The test configurations in this list can be created and modified in the Configuration Library or in the Setup step in the Test Editor.
View Existing Configurations
Within a web project, all configuration sets are stored within the Configuration Library. The following information is displayed for each configuration:
- Name - name given to identify the configuration
- OS- the operating system used for the configuration
- Resolution- the screen resolution used for the configuration
- Browser- the browser used for the configuration
- Step Timeout - the amount of time in milliseconds the test will timeout
- Step Delay - the amount of time Testim will automatically pause between each step in the test

- Configuration Library – You can create a new configuration in your configuration library. This configuration will apply to all steps run in a test that is set with that configuration (including tests run via CLI or Scheduler). For more information on test configuration, see Setting the Test Configuration. For more information about the CLI, see Command line interface: Test Config. For more information about the Scheduler, see Scheduler.
- Setup Step in the Test Editor – Every test has its own default configuration accessible from the property panel of the test’s Setup step. The configuration parameters that are set in the test’s default configuration will apply unless the test is run from the CLI or a scheduler with a different configuration.
When the test is run in the CLI, you can override the default configuration by specifying a new test configuration in the run command, see Command line interface.
If you run a test locally on a system that doesn’t correspond with the test configuration, then the test will run with the available configuration and a warning message will be shown.
Creating and modifying test configurations in the Configuration Library
In the Configuration Library you can create new test configurations. You can also clone, modify, rename, and delete current configurations.
Creating a new test configuration
To create a new test configuration:
- In the left menu, navigate to Runs > Configuration List.

The Configuration Library is shown.
- Click the + Create New button.

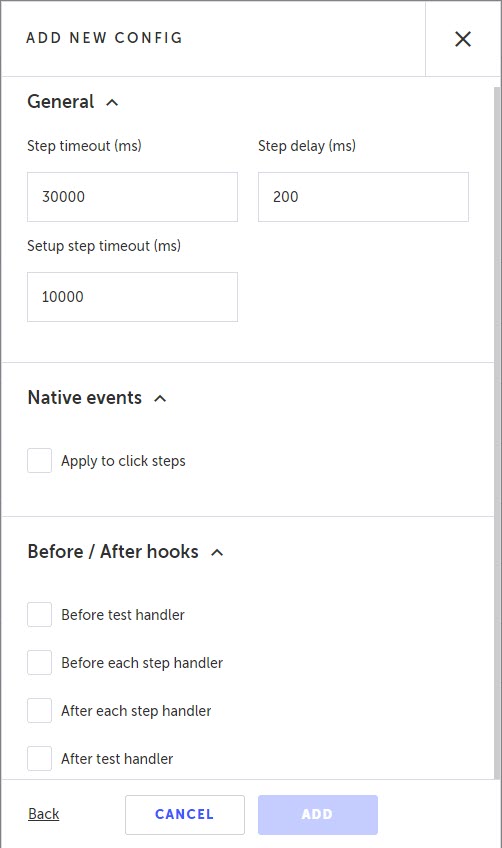
The Add New Config settings are shown.

- Enter the basic options as follows:
- In the Name field, enter a name for this new configuration.
- In the Browser section, click the dropdown arrow and select your desired browser.
- In the OS section, click the dropdown arrow and select your desired operating system.
- In the Resolution section, click the dropdown arrow and select your desired resolution.
-
Click Advanced.
The advanced configuration options are shown.
-
In the General section, modify the Step timeout, Step delay, and Setup step timeout settings as desired. For more information, see Test Configuration Parameters.
-
In the Native Events section, you can overwrite the default setting of how a click step will be handled with another setting just for this test configuration. By default, at the project level, the Click steps are configured to use either native or non-native events by default. Sometimes a test will fail because even though the “click step” passed, the click wasn’t actually executed. A possible solution is to try to configure the click steps in the test with the opposite configuration (i.e., instead of native, non-native and vice versa). Instead of changing the configuration for every click step individually, you can create a test configuration that overwrites the default native/non-native configuration and then simply run the test with this configuration to check if the opposite setting has fixed the problem. To overwrite the default Native events setting, select the Apply to click steps checkbox.
-
Under Click event type, the current default setting is displayed. To overwrite the default setting for this test configuration, click the drop-down menu and select the other value (e.g., if it was Native click event, select Non-native click event).

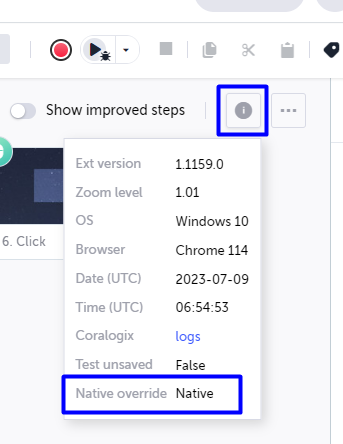
After running a test with the native override, you will see an indication in the test running summary, stating whether the native or non-native override was applied, as shown in the example below in which the Native click event option was selected.
-
In the Before/After hooks section, modify the settings as desired. For more information, see Before & after hooks.
-
Click Add.
The configuration is created and added to the Configuration Library.
Cloning a test configuration
To clone a test configuration:
- In the left menu, navigate to Runs > Configuration List.

The Configuration Library is shown.
- Click on the row of the test configuration you wish to clone.
Context tools are shown.

- Click the Clone icon.

Alternatively, you can right-click the row, and select Clone.
The Clone Configuration options are shown.

- In the Name field, enter a name for the cloned configuration.
- Click Clone.
The configuration is cloned and is shown in the Configuration Library.
Modifying a test configuration
To modify a test configuration:
- In the left menu, navigate to Runs > Configuration List.

The Configuration Library is shown.
- Double-click on the row of the test configuration you wish to modify.
The Edit Config settings are shown.
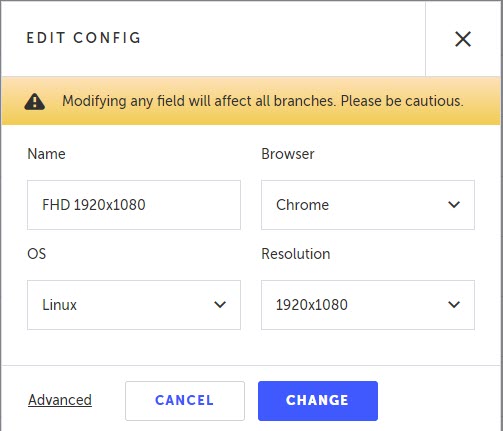
- Modify the basic options as follows:
- In the Name field, enter a name for this new configuration.
- In the Browser section, click the dropdown arrow and select your desired browser.
- In the OS section, click the dropdown arrow and select your desired operating system.
- In the Resolution section, click the dropdown arrow and select your desired resolution.
- Click Advanced.
The advanced configuration options are shown.
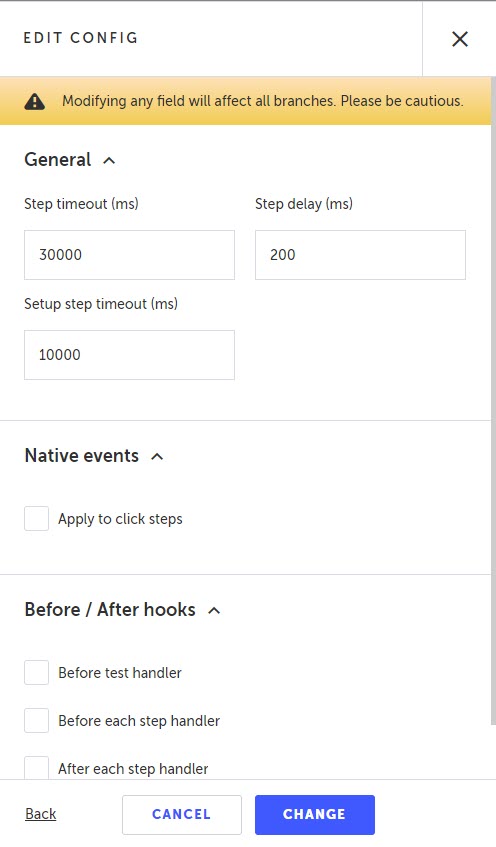
- In the General section, modify the Step timeout, Step delay, and Setup step timeout settings as desired. For more information, see Test Configuration Parameters.
- In the Native Events section, you can overwrite the default setting of how a click step will be handled with another setting just for this test configuration. By default, at the project level, the Click steps are configured to use either native or non-native events by default. Sometimes a test will fail because even though the “click step” passed, the click wasn’t actually executed. A possible solution is to try to configure the click steps in the test with the opposite configuration (i.e., instead of native, non-native and vice versa). Instead of changing the configuration for every click step individually, you can create a test configuration that overwrites the default native/non-native configuration and then simply run the test with this configuration to check if the opposite setting has fixed the problem. To overwrite the default Native events setting, select the Apply to click steps checkbox.
- Under Click event type, the current default setting is displayed. To overwrite the default setting for this test configuration, click the drop-down menu and select the other value (e.g., if it was Native click event, select Non-native click event).
- In the Before/After hooks section, modify the settings as desired. For more information, see Before & after hooks.
- Click Change.
The configuration is modified.
Renaming a test configuration
To rename a test configuration:
- In the left menu, navigate to Runs > Configuration List.

The Configuration Library is shown.
- Click on the row of the test configuration you wish to rename.
Context tools are shown.

- Click the Rename icon.

Alternatively, you can right-click the row, and select Rename.
The Edit Name settings are shown.

- In the New name field, enter a new name for this configuration.
- Click OK.
The configuration is renamed.
Deleting a test configuration
To delete a test configuration:
- In the left menu, navigate to Runs > Configuration List.

The Configuration Library is shown.
- Click on the row of the test configuration you wish to delete.
Context tools are shown.

- Click the Delete icon.

Alternatively, you can right-click the row, and select Delete.
A confirmation dialogue is shown.

- Click Delete.
The configuration is removed from the Configuration Library.
Filtering the Configuration Library
You can apply filters to the Configuration Library to only display items that meet a specific criteria.
To filter the Configuration Library:
- Navigate to Runs > Configuration List.
- Click the Advanced Filters button in the action menu.

- Select the desired filters from the Filter Configuration panel and click the Apply button.

The list of scheduled runs is now filtered based on your filter selections. To learn more about saving this filtered view, see Saving a Filtered View.
Creating and modifying test configurations in the Test Editor
Test configurations that are modified in the Test Editor are added to the Configuration Library if the configuration includes a name and the test is saved. The newly added test configuration can be used for future tests.
To modify a test configuration within a test:
- Hover over a test's Setup step (the first step) and click the Show properties () icon.

The Properties panel opens on the right hand side.

- In the Configuration section, click on the Edit Configuration icon.

The Edit Configuration settings are shown.
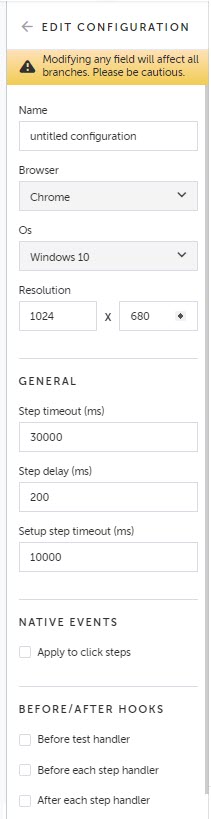
- Modify the options as follows:
- In the Name field, enter a name for this configuration. (If you don’t enter a name, the test configuration will NOT be saved in the Configuration Library.)
- In the Browser section, click the dropdown arrow and select your desired browser.
- In the OS section, click the dropdown arrow and select your desired operating system.
- In the Resolution section, select your desired resolution.
- Modify the Step timeout, Step delay, and Setup step timeout settings as desired. For more information, see Test Configuration Parameters.
- In the Native Events section, you can overwrite the default setting of how a click step will be handled with another setting just for this test configuration. By default, at the project level, the Click steps are configured to use either native or non-native events by default. Sometimes a test will fail because even though the “click step” passed, the click wasn’t actually executed. A possible solution is to try to configure the click steps in the test with the opposite configuration (i.e., instead of native, non-native and vice versa). Instead of changing the configuration for every click step individually, you can create a test configuration that overwrites the default native/non-native configuration and then simply run the test with this configuration to check if the opposite setting has fixed the problem. To overwrite the default Native events setting, select the Apply to click steps checkbox. Under Click event type, the current default setting is displayed. To overwrite the default setting for this test configuration, click the drop-down menu and select the other value (e.g., if it was Native click event, select Non-native click event).
- In the Before/After hooks section, modify the settings as desired. For more information, see Before & after hooks.
- Click the back arrow to close the Edit Configuration settings.

- Click Save.

The Change Message window opens.

- In the Message field, optionally enter a description of the changes made in this version.
- Click OK.
The test is saved. If you entered a name in the Name field in the Configuration settings, the configuration will be listed in the Configuration Library.
Updated 4 months ago